

A tracheostomy is an artificial opening (stoma) in the trachea, at the front of the neck- it's used to maintain airway patency, relieve upper airway obstruction, assist with mechanical ventilation, and facilitate removal of secretions. It is generally situated between the 1st and 3rd tracheal rings, dependent on the type of trachy being inserted, and normal anatomy allowing.

Tracheostomies, or a trachy, can be a short term intervention, for example if being used to wean off a ventilator, or long term if ongoing airway patency or secretion management is an issue.
There's a few different types to be aware of- firstly, there's the method of insertion.
A percutaneous trachy can be done at the bedside in ICU, using a Seldinger technique (a guidewire and gradual dilation, and obviously local anaesthetic, generally alongside a bronchoscope to visualise tissues- ultrasound and anatomy landmarking can also be used). This has the advantage of avoiding a patient transfer, minimising time spent waiting for a theatre to become available (therefore potentially less waiting for a procedure = less time on a ventilator = less VAP and deconditioning- but speed of trachy formation is contentious, see point about the TracMan trial below) and the procedure itself being quicker than a surgical tracheostomy, with lower post-op infection and bleeding risks. However, greater intra-procedural, technical difficulties have been noted. Other disadvantages largely come from the bronchoscope- the risk of damage to tissues is higher, and it is more difficult to visualise tissues when compared to a surgical approach.
A surgical trachy is what it sounds like- a surgical incision, in theatres, directly into the trachea to allow insertion of a tube. The clear advantage is the direct visualisation of anatomy- vessels, nerves etc so may be more appropriate for altered or more complex anatomy. The disadvantages include a higher bleeding risk, due to the incision made, and a longer procedure time. These also tend to heal marginally faster than a perc trachy.
The TL;DR is that there's no real difference in complication rates between surgical and perc trachys, so it's going to be a decision that's patient dependent.
There is a 3rd type, which I have never seen in practice so can't give any kind of personal experience about- but a mini trachy is a much smaller tube that can be used for suctioning secretions. Because of the smaller size, you ideally wouldn't use it for ventilation (but in an emergency, it would do in a pinch).
The overall advantages of any kind of trachy do, in my opinion, outweigh the risks. Often times in ICU, it's a fairly life or death kind of situation so although there are obviously risks associated with a procedure like tracheostomy formation (such as risk of bleeding, infection, tracheal damage and stenosis) I would say that the benefits of a trachy do outweigh these. Below are some of the benefits of a tracheostomy (compared to no airway adjunct or compared to an ETT):
Reduced anatomical dead space for ventilation, assists with weaning from mechanical ventilation
Able to provide positive pressure ventilation (if tube is cuffed- see below)
More comfortable for the patient (as trachea not so irritated by a big ol ETT, and reduced sedation requirements)
Patient able to vocalise/speak (if tube is fenestrated, and with use of additional equipment- see below)
More easily allows oral care (part of the VAP care bundle, therefore IMPORTANT)
More easily allows mobilisation (for obvious reasons, IMPORTANT)
Facilitates suctioning to manage secretions- a process lovingly named 'tracheal toileting'
continued airway protection- can be used long term e.g. in patients with
neuromuscular conditions (MS, GBS)
There are multiple types of tube, and the type and size is patient dependent. The ICS 2014 guidelines have given clarification on factors that influence choice of tube- for example, trying to use the highest diameter possible to reduce resistance, while balancing the need for space in the trachea, to allow airflow to be able to get around the tube if cuff deflated. LITFL have a really helpful page (available below) about trachy complications, which includes a comprehensive run down of potential complications from incorrect tube sizes.
The vast majority of tubes will consist of an outer tube and a removable inner tube. This acts as a safety mechanism- if your inner tube blocks off, you can remove this and still have a patent outer tube. As discussed later on, there may be scenarios in ICU where just an outer tube is more advantageous. Other variations in tubes include-
Cuffed...
If your patient is being mechanically ventilated, using positive pressure ventilation, their tube needs to have a cuff and the cuff needs to be inflated. Otherwise, there won't be a seal and the ventilation will not be effective. Similarly, if your patient is unable to manage their own secretions (i.e. they're too copious, and the patient has a poor cough) you'll want the cuff up to prevent aspiration of secretions (which could lead to VAP = BAD). As your patient progresses towards weaning and/or decannulation, you may be able to have cuff down trials, which will also allow your patient to start vocalising.
Fenestrated...
This means that the tube has holes in the upper surface- either multiple small holes, or one larger window. A fenestrated tube isn't suitable for a patient being ventilated or requiring frequent suctioning (from a logistical POV, it's really hard to get a suction catheter down when it keeps poking out the holes in the top). A fenestrated tube will be used for patients who are working towards decannulation, and for patients who are suitable for vocalising. The concept of vocalisation comes from air moving over the vocal cords to produce sounds- in a non-fenestrated tube, the air isn't able to pass over the cords. It's important to remember that both the inner and outer tubes need to be fenestrated for vocalisation (and it is possible to have a fenestrated outer tube with a non-fenestrated inner tube, to allow for suctioning if needed)
Subglottic suction...
Patients with copious secretions may also accumulate mucus below the vocal cords but on top of the cuff, in the subglottic region. In these cases, it's possible to have a separate port that can be aspirated every 2-4 hours to reduce chances of aspiration and therefore of VAP.


TRACHEOSTOMY CARE- aka the real point of this post.
There's a few aspects of care specific to trachys (but you'll also recognise from ETT care), and some which fall under the more general VAP care bundle (see this post for more details). The NTSP have a list of 'basic care' in relation to tracheostomies, which you can access from the sources down below. They have videos on actions such as suctioning, and I'll address some of their points here-
Cuff monitoring- the cuff pressure should be checked every 4 hours using a cuff manometer or continuous cuff monitoring, and should be between 20-25 cmH20.
A pressure higher than 25 cmH20 runs the risk of barotrauma and tracheal mucosal pressure damage (potentially deteriorating to the point of a tracheal-oseophageal fistula forming), where a lower pressure has increased risks of aspiration and poor ventilation due to lack of a seal.
Suctioning- the need for suctioning should be assessed every 2 hours- but you don't necessarily have to suction q2hrs. This relies on clinical judgement, patient status and history. If your patient has no secretions, do you really need to introduce a suction catheter? Saying that, suctioning and use of subglottic suction forms part of the VAP care bundle so can't be forgotten about.
Over suctioning runs the risk of tracheal damage, patient discomfort, hypoxia, and bradycardia (through vagus nerve stimulation). Make sure that your suctioning procedure is solid- this includes:
monitoring obs during and after (particularly SpO2, HR and BP.)
pre-oxygenation at FiO2 100%
duration of suction (shouldn't be longer than 10 secs, to avoid hypoxia)
length or suction tubing (you don't need to put the entire length of the fine bore suction tube down into the trachy, just enough to hit the carina and then pull back slightly before applying suction)
size of suction tube (the equation goes (patient tube size - 2) x 2 - so if you had a size 7 trachy tube, you'd use a size 10 suction tube)
Inner tube- the inner tube should be changed every 8 hours (or at least once per shift) but can be assessed more frequently (eg 4 hourly in patients with a productive chest) and changed PRN. This is to ensure that it remains clean and patent. You should always have a back-up inner cannula at the bedside, that can be used in case of emergency or for routine tube changes. After removing the old tube, clean it using sterile water and a swab, then leave to air dry and store in a denture pot (the most versatile piece of equipment in healthcare).
Bear in mind that the presence of an inner cannula does reduce the overall diameter of the tracheostomy, which can lead to an increased work of breathing and increased airway pressures/resistance- this can particularly be an issue for ventilated patients. An alarm for high airway pressures may indicate that the inner tube is becoming blocked, with secretions or a blood clot, and this should trigger you to assess this tube. Equally, in situations where ventilation is more difficult (higher FiO2, higher pressures), circuit disconnections to assess inner tube patency must be assessed, given the risk of derecruitment. In these situation, having only an outer tube may be safer.
Outer tube- a tracheostomy tract can take 7-14 days to mature and heal to a point of 'relative' safety if the entire trachy tube were to fall out- during this time, it's recommended to not try and replace the outer tube. After that, it's recommended to have a planned change q28 days to reduce colonisation of the tube, and therefore reduce the infection risks. The critical part of that sentence is the 'PLANNED' change. An emergency change (as expected) carries much higher risks compared to an expected, organised, controlled outer tube change. So they take home point is avoid accidental dislodgement or decannulation that might lead to an unexpected tube change, and try to stick to the planned ones every month or so. Changing the outer tube can also form part of weaning, as 'down-sizing' is an important part of working towards decannulation.
(as a side note, when I started working, I had no idea that you could even replace the outer tube, let alone that you were supposed to routinely do it. So the first time our Reg asked me to help with a tube change, I was baffled. It was actually an incredibly smooth process- just pre-oxygenate, have all your equipment ready (including emergency equipment- and particularly a downsized trachy tube), and then they just whip the old one out and pop a new one in, easy as).
Wound care- dressings, tapes and peri-stomal skin should also be assessed every 8 hours/once per shift, and dressings changed every 24 hours (or more frequently if required). Changing dressings or tapes should always be a 2 PERSON JOB. This is because the tube is likely to be unsecured (as they are not always stitched in situ) during the dressing change, so another person is required to hold to tube and prevent accidental dislodgement or decannulation.
The stoma site should be cleaned using ANTT, with sterile water or saline and gauze, around the stoma and under the flanges of the tube. Make sure to check the stoma site for any signs of local infection (redness, odour, discharge etc) and take a wound swab if indicated, and check for other complications, such as bleeding. Once satisfied that the site is clean and healthy, pat dry with gauze and reapply tapes/dressings. Tapes should not be too tight or too loose around the neck (the aim is to avoid pressure damage from tapes, whilst ensuring that tube is actually secured- you should be able to slip a finger underneath the tapes) and dressings should be 'keyhole' dressings, made from a foam type material that won't leave fibres around the stoma.

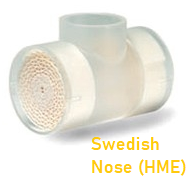
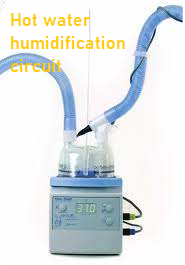
Humidification- Humidification is super important for tracheostomy patients. In normal anatomy, air inspired through the nasopharynx is warmed, cleaned and moistened by the cilia present in the respiratory tract. Unfortunately, in a tracheostomy, these mechanisms are bypassed which can lead to secretions becoming more tenacious (sticky) with increased risks of causing a blockage. There are a few different methods- including Heat-Moisture Exchanges (Swedish nose and Buchanan bib) and heated circuits. Other ways to improve the viscosity of secretions include adequate hydration and use of mucolytics (acetylcystine, carbocystine, saline nebulisers). Use of humidification methods should follow the humidification ladder:
HME - Self ventilating patients (no oxygen)
Cold water bath - Self ventilating patient (on oxygen)
HME for breathing circuit - Ventilated patient with minimal secretions (replace every 24 hrs)
Heated water bath - Ventilated patient with thick secretions or self-ventilating patient (on oxygen) with thick secretions


Capnography- as is standard practice for any ventilated patient, capnography and end tidal CO2 monitoring should be used to give an indication of adequacy of gas exchange and for ensuring that the tube is in situ in the trachea. Obviously cannot be used for self ventilating patients. Loss of an ETCO2 trace is a RED FLAG, and you should CONTINUE READING onto the NEXT SECTION of this post to find out what to do if this happens.
Vocalisation- as mentioned above, vocalisation and speaking requires air flow over the vocal cords to create sounds. With a cuffed, non-fenestrated trachy tube, this is not possible (if this is what your patient has, and they can suddenly vocalise, that is a RED FLAG!!!)
The NTSP has a section on communication with tracheostomies, linked below, but there are a number of steps you can take to help your patient start vocalising-
Fenestrated tube (inner and outer)
Deflate the cuff- can try initially with a cuff deflation trial.
Speaking valve (cuff MUST be deflated as this prevents exhalation- patient will suffer barotrauma, loss of CO as intrathoracic pressure rises, or literally suffocate)
These actions all require your patient to be able to manage their own secretions and tolerate having the cuff down. The real benefits are preventing atrophy of vocal cords through lack of use, and facilitating easier communication- if your patient is not ready for this, you must ensure that you have established other ways of communicating, whether that's writing, lip reading, sign language, picture boards, or through technology. Get your friendly neighbourhood Speech and Language Therapist involved!!!
!! EMERGENCY CARE !!
Nobody likes an emergency, but an airway emergency is especially frowned upon (there's a reason Airway comes first in your A-E assessment, and that's because it's IMPORTANT). Any kind of artificial airway comes with a higher risk than a natural airway (obviously) but there's a few simple ways to reduce that risk.
Types of emergency that might occur include-
Tube displacement- partial or complete. Partial can include outwards displacements or movement into pre-tracheal tissues (which may not be as physically obvious). Complete does what it says on the tin- you no longer have a tube in the stoma.

Haemorrhage- Early bleeding (i.e. within 72 hours of tracheostomy formation) is more common, is usually benign, and is often due to suction/manipulation of the tube in a fresh stoma. Late bleeding occurs less often and has a range of causes including bleeding granulation tissue, erosion through a blood vessel, including the brachiocephalic artery (this is BAD), fistula formation or site infection.
Blocked tube- with blood or secretions. This can be gradual or sudden onset, and is usually fixed by removing the inner tube, but on occasion can persist.
Tracheostomy emergencies can be heralded by red flags, which are indicators of changes that signify that something might be about to go south... These should be used in conjunction with your ABCDE assessment.
RED FLAGS for a trachy in trouble...
unable to pass suction catheter
altered or absent capnography trace
unexpected vocalisation with a cuffed/non-fenestrated tube
frequent cuff re inflation, indicating a cuff leak
visibly displaced tube (able to see more of the tube outside of the stoma than previously)
bleeding from stoma site/blood in tube/blood in suction contents
respiratory distress- increasing O2 requirements, increasing ventilatory support, increased RR, decreased SpO2
increasing airway pressures
general signs of deterioration- other vital signs off, increased agitation, anxiety or confusion.
As the popular saying goes- 'fail to prepare and you prepare to fail'. The ways in which we prepare for a potential emergency include...
Emergency boxes... alongside all the basic and usual emergency equipment you'd expect to have accessible (like suction catheters, humidification options, cuff manometer, airway trolley with intubation equipment etc) you also need to have a dedicated trachy emergency box at the bedside. Usually these are blue boxes, and should contain:
- trachy tube same size as current (inner and outer)
- trachy tube one size smaller (if your tube falls out, the stoma may start to shrink so would be difficult to reinsert the same sized tube) (inner and outer)
- non fenestrated inner tube (if a fenestrated outer tube is present)
- scissors & stitch cutters
- lubricating gel
- 10 mL syringe
- tracheal dilators
- dressings and tapes
- catheter mount
- paediatric pocket mask
Bed head signs... if your patient has a tracheostomy, they should have a green sign above their bed which outlines the type and size of tube on one side, alongside emergency contact numbers specific to your hospital, and have a copy of the tracheostomy emergency algorithm on the other. The benefit of having an algorithm is that it standardises the procedure, and clearly leads you through each step so that you don't panic in an emergency situation. These signs have been produced by the NTSP and look like this... (you can access a downloadable/printable document from the sources at the end)


The initial actions for any trachy emergency will usually involve applying high flow O2, removing the inner tube, deflating the cuff and CALLING FOR HELP- a senior nurse, coordinator, doctor, emergency team (2222 or 4444). Your main priorities, as identified by ICS (2014) are ensuring adequate ventilation, and seeking the most suitable assistance early.
Difficult airway trolley.... 2014 ICS guidelines identified the need for a difficult airway trolley in every ICU as an essential item to manage tracheostomies, which should contain 'a range of tracheal tubes, laryngoscopes, bougies, airway exchange catheters, laryngeal mask airways, paediatric facemasks, and cricothyroid needles/cannulae for emergency oxygen insufflation' (ICS, 2014). More details about DATs can be found on the Difficult Airway Society page.
The best way to treat an airway emergency is by preventing it from happening in the first place. So If you notice any of the red flags above, or are concerned, seek help and second opinions. Keep on top of your basic care to try and avoid issues going unseen. If an emergency does occur, stay calm and follow the algorithm (it's there for a reason!)
Your management of an airway emergency will be different if your patient has a laryngectomy. In this situation, the patient has no patent upper airway and so this would not be an option for ventilating. Any oxygen would need to be applied directly to the stoma site.
The presence of a laryngectomy should be reflected in the bedhead signs- they will have a pink sign instead of green, with a different emergency algorithm on the reverse. There may also be a specific laryngectomy emergency box.
In established laryngectomies, there may not be a tube in the stoma- therefore any airway emergencies in larygectomy patients are more likely to occur in a new tracheostomy.
and finally...
As promised long ago at the beginning of this mammoth post- the interesting 'timing of trachy' debate and the TracMan trial. This was a multi centre RCT (led by one of our consultants in Oxford, we love you Duncan!) , using 909 patients between 2004 and 2011, considering the impacts of 'early' vs 'late' tracheostomy on mortality outcomes. Patients had a tracheostomy formed either on day 4 of mechanical ventilation, (early- if at least 7 more days of MV were anticipated) or on/after day 10 of mechanical ventilation (late). The results- there's really not much difference in mortality with early or late tracheostomy formation. There was also no real difference in LOS in ICU, although marginally fewer complications were reported for early trachys. Basically, look at your patient, take guidance from colleagues, and decide if/when a tracheostomy may be beneficial for your patient.
Thank you for reading all the way through this post! I really hope you learnt something useful that you can take into practice with you. Below is a list of sources and resources, and I've bolded the ones that I think are most useful or that influenced most of this post!
Please like and comment on this post or on twitter/instagram (@christienursing) with any questions/suggestions, and feel free to share!
Love, Christie x
SOURCES...
Very helpfully, they've summarised evidence from 1999 to 2007 comparing the 2 types of trachy, and beautifully laid out the advantages and disadvantages of each- somewhat out of date now in 2020, so see also...
Putensen, C. et al. (2014) 'Percutaneous and surgical tracheostomy in critically ill adult patients: a meta-analysis' in Critical Care, 18(544) https://link.springer.com/content/pdf/10.1186/s13054-014-0544-7.pdf
Identified that percutaneous approaches, compared to surgical, demonstrated stat. sig. reductions in post op bleeding and stoma infections, but also found higher risks of procedural technical difficulties. Analysis of 14 RCTs, so results likely to be reliable and valid.
Iftikhar, I. et al. (2019) 'A network comparative meta‑analysis of percutaneous dilatational tracheostomies using anatomic landmarks, bronchoscopic, and ultrasound guidance versus open surgical tracheostomy' in Lung, 197, pp.267-275 http://website60s.com/upload/files/lung-v197-iss-3-a2.pdf
A 2019 meta analysis of 24 studies from 1991 to 2018 comparing surgical trachys and 3 methods of perc trachy (anatomical location guided, bronchoscope guided and ultrasound guided). Identified... not much really. There was no major difference in levels of complications, intra op or post op, for all 4 methods. The only thing of note was the conclusion that a surgical trachy takes longer as a procedure than a perc.
Critical Care Practitioner https://www.criticalcarepractitioner.co.uk/tracheostomy-care/#
LITFL- Tracheostomy. https://litfl.com/tracheostomy/
LITFL- Tracheostomy complications. https://litfl.com/tracheostomy-complications/
National Tracheostomy Safety Project- Improving Tracheostomy Care (2018) Interim Results http://tracheostomy.org.uk/storage/files/Interim%20ITC%20Results%20fact%20sheet.pdf
Full results from The Global Tracheostomy Initiative are expected in Autumn 2020 (not long to wait folks!). This was a project involving 20 UK NHS hospital sites looking at how to implement international best practice for trachy care to improve safety and quality of care for patients with tracheostomies. The 2018 interim results (linked above) highlighted changes to eating and drinking, communication, safety, LOS and costs of hospital stays when staff received targeted training on trachy care.
National Tracheostomy Safety Project- Basic Care (Adults) http://www.tracheostomy.org.uk/healthcare-staff/basic-care
National Tracheostomy Safety Project- Swallowing and Communication (Adults) http://www.tracheostomy.org.uk/healthcare-staff/vocalisation
National Tracheostomy Safety Project (2013) 'Humidification' in 'Day to day management of tracheostomies and laryngectomies' http://www.tracheostomy.org.uk/storage/files/HumidificationNew.pdf
National Tracheostomy Safety Project (2013) 'Bedside equipment' in 'Day to day management of tracheostomies and laryngectomies'
National Tracheostomy Safety Project- NTSP Algorithms and Bedheads. http://www.tracheostomy.org.uk/NTSP-Algorithms-and-Bedheads
LINK TO THE ACTUAL SIGN (CAN BE DOWNLOADED OR PRINTED)- http://www.tracheostomy.org.uk/storage/files/NTSP_GREEN_Algorithm_Double_sided.pdf
RCNi Learning- Caring for patient with a temporary tracheostomy.
This is an online module, which is currently accessible for free due to Covid! Search RCNi Leaning for more details.
Sinha, V., Aina, T., Fitzgerald, B. (2020) 'Surgical airway suctioning' in StatPearls https://www.ncbi.nlm.nih.gov/books/NBK448077/
Hellyer, T., Eqan, V., Wilson, P., Simpson, J. (2016) 'The Intensive Care Society recommended bundle of interventions for the prevention of ventilator-associated pneumonia' in Journals of the Intensive Care Society. 17(3), pp. 238-243. https://www.ncbi.nlm.nih.gov/pmc/articles/PMC5606527/
Higgins, D. (2009) 'Tracheostomy care 3- Dressing' in Nursing Times. https://cdn.ps.emap.com/wp-content/uploads/sites/3/2009/02/090217PPTrach2.pdf
Young, D. (2007). TracMan, Full Protocol- Version 11, 26 October 2007.
Young, D. et al. (2013) 'Effect of early vs late tracheostomy placement on survival in patients receiving mechanical ventilation: the TracMan randomized trial' in Journal of the American Medical Association. 309(20), pp. 2121-2129. https://pubmed.ncbi.nlm.nih.gov/23695482/
As discussed in the post, this study took place over 7 years with over 900 patients, and found no real difference (and certainly no stat. sig differences) in measurable outcomes such as mortality and LOS when comparing early vs late tracheostomy formation in ICU.
Difficult Airway Society- Setting up a difficult airway trolley. (DAT) https://das.uk.com/content/difficult_airway_trolley
Intensive Care Society (2014) ICS Tracheostomy Standards. https://www.ics.ac.uk/ICS/ICS/GuidelinesAndStandards/ICSGuidelines.aspx
You need to scroll down ther page to find this guideline- it is a long document, and was due for review in 2018 (not sure if it was reviewed, and I just can't find an updated version?) but it really does lay out everything you might need to know about tracheostomy management. A true bible for ICU nurses, or nurses on cohort wards with tracheostomy patients!
Comments